Table of Contents
You’ve set up your Cash App account and added your friends. Now comes the fun part: actually sending money. Whether you’re splitting dinner with friends, paying rent to your roommate, or sending birthday money to family, Cash App makes it incredibly simple.
But there’s more to sending money on Cash App than just tapping a few buttons. Understanding payment methods, fees, transfer speeds, and smart practices can save you money and headaches. This complete guide covers everything you need to know about sending money through Cash App like a pro.
How to Send Money on Cash App: Basic Steps
Let’s start with the fundamentals. Here’s exactly how to send money to someone on Cash App.
Method 1: Send Money Using the Pay Button
This is the most common way to send money on Cash App.
Step 1: Open Cash App Launch the app on your iPhone or Android device and make sure you’re logged in.
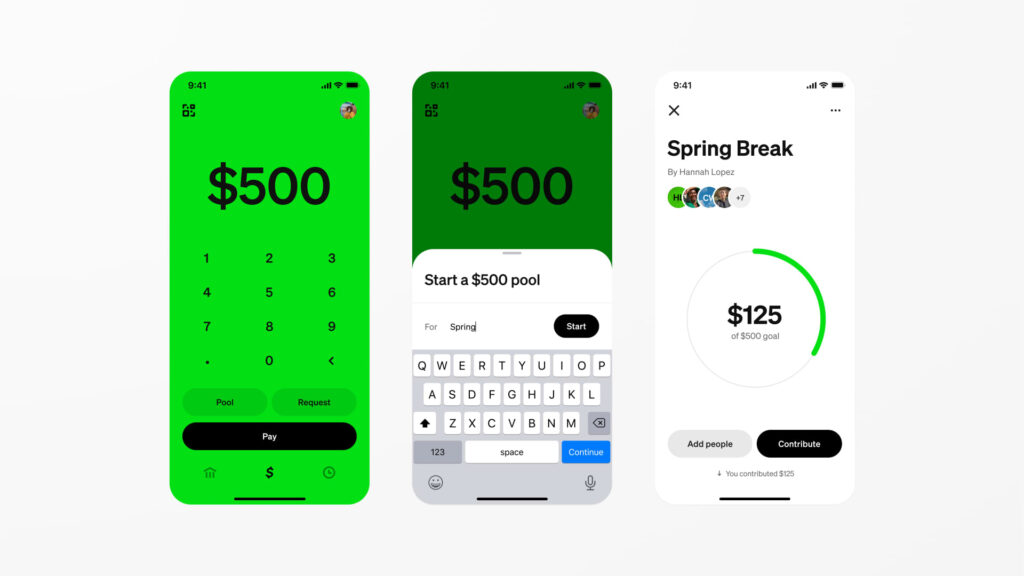
Step 2: Tap the Dollar Sign On your home screen, you’ll see a large dollar sign ($) icon at the bottom center. Tap it to start a new payment.
Step 3: Enter the Amount Type in how much money you want to send. You can enter any amount from $1 up to your sending limit (more on limits later).
Step 4: Tap “Pay” After entering the amount, tap the green “Pay” button at the bottom of the screen.
Step 5: Select or Enter Recipient Now you need to choose who receives the money. You have several options:
- Recent contacts: Scroll through people you’ve paid before
- Search by $Cashtag: Type their unique Cash App username (like $JohnSmith)
- Search by phone number: Enter their phone number if it’s linked to their Cash App
- Search by email: Use their email address if connected to their account
Step 6: Add a Note (Optional but Recommended) Before sending, you can add a note explaining what the payment is for. Write something like “Dinner last night” or “Your half of rent.” This helps both of you track expenses.
Step 7: Confirm and Send Review the amount, recipient, and note one final time. When everything looks correct, tap the green “Pay” button again. The money sends instantly.
You’ll see a confirmation screen showing the payment was successful, and your recipient gets a notification immediately.
People Also Read : How to Add People on Cash App (And Earn $5 Per Friend)
Method 2: Send Money by Requesting
Sometimes it’s easier to request money rather than send it directly, especially for splitting bills.
How to request money:
- Tap the dollar sign ($) icon
- Enter the amount
- Tap “Request” instead of “Pay”
- Select the person you’re requesting from
- Add a note explaining what they owe you
- Tap “Request” to send the request
The person receives a notification and can pay you with one tap. This method is perfect for shared expenses where you paid the full amount upfront.
Method 3: Scan Someone’s QR Code
Cash App gives every user a unique QR code for instant payments.
To send money via QR code:
- Tap the dollar sign ($) icon
- Look for the small QR code scanner icon (usually top-right corner)
- Point your camera at their Cash App QR code
- Enter the amount you want to send
- Add a note and confirm
To receive money via your QR code:
- Tap your profile icon
- Select the QR code icon
- Show your QR code to the person paying you
- They scan it and send the payment
This method is super convenient when you’re standing next to someone and need to pay them quickly.
Understanding Cash App Payment Methods
Where your money comes from matters because it affects fees and processing times. Cash App gives you multiple payment sources.
Your Cash App Balance
Money sitting in your Cash App account is called your Cash App balance. This is the best source for sending money because:
- Zero fees: Sending from your balance is always free
- Instant transfer: The recipient gets money immediately
- No daily limits beyond standard sending limits
You build up a Cash App balance when people send you money or when you add cash to your account.
Linked Bank Account
You can connect your checking or savings account to Cash App for direct transfers.
Pros:
- No fees for standard transfers
- Good for larger amounts
- Money comes straight from your bank
Cons:
- Takes 1-3 business days unless you pay for instant deposit
- Requires account verification
- Daily transfer limits apply
Linked Debit Card
Connecting a Visa, Mastercard, Discover, or American Express debit card gives you instant access to funds.
Pros:
- Sends money instantly
- Works even with zero Cash App balance
- Easy to set up
Cons:
- 3% fee applies (this is the big one)
- Counts against your card’s daily limits
- Not all debit cards are eligible
Important: The 3% fee only applies when sending money from a debit card, not when receiving money or sending from your Cash App balance.
People Also Read : 20 Best Cash App Alternatives: Find the Perfect Payment App for Your Needs
Credit Cards
Cash App does not accept credit cards for sending money to individuals. You can only use credit cards for purchasing Bitcoin through the app.
If you try to add a credit card for regular payments, Cash App will reject it. This policy exists to prevent people from running up credit card debt for cash advances.
Cash App Fees: What You’ll Actually Pay
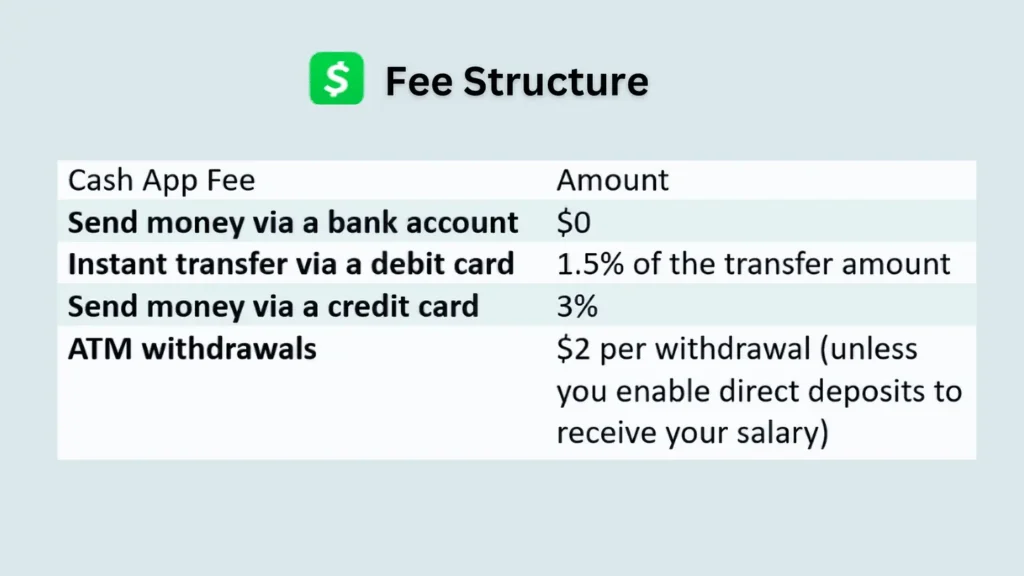
One of Cash App’s biggest selling points is that most transactions are free. But there are situations where fees apply.
Complete Fee Breakdown
| Transaction Type | Fee | When It Applies |
|---|---|---|
| Send from Cash App balance | FREE | Always free |
| Send from linked bank account | FREE | Standard 1-3 day transfer |
| Send from debit card | 3% | Instant transfer only |
| Receive money | FREE | Always free |
| Standard bank transfer (cash out) | FREE | Takes 1-3 business days |
| Instant deposit to debit card | 0.5% to 1.75% | Minimum $0.25 fee |
| Cash App Card ATM withdrawal | $2.50 | Per withdrawal at out-of-network ATMs |
| Business account payments | 2.75% | When you have a business account |
How to Avoid Fees Completely
Follow these strategies to send money without paying any fees:
1. Always send from your Cash App balance or bank account Never send directly from a debit card unless you’re in an emergency. The 3% fee adds up quickly.
Example: Sending $100 from a debit card costs you $3. Sending $1,000 costs you $30. That’s money you’re throwing away.
2. Plan ahead for larger transfers If you need to send a big amount, transfer money from your bank to Cash App first (free), then send it (also free). Yes, it takes 1-3 days, but you’ll save the fee.
3. Keep money in your Cash App balance When people pay you, leave some money in your Cash App account instead of cashing out immediately. Then you’ll have a free balance ready for future payments.
4. Use standard transfers instead of instant Unless you absolutely need money in your bank account right now, use the free standard transfer option and wait the 1-3 business days.
Cash App Sending Limits: How Much Can You Send?
Cash App restricts how much money you can send to prevent fraud and protect users. Your limits depend on whether you’ve verified your account.
Unverified Account Limits
If you haven’t verified your identity, you’re limited to:
| Time Period | Sending Limit | Receiving Limit |
|---|---|---|
| Per 7 days | $250 | Unlimited |
| Per 30 days | No additional limit | $1,000 |
This means you can send up to $250 every rolling 7-day period. You can receive unlimited amounts within 7 days, but only up to $1,000 within any 30-day period.
Example: On January 1st, you send $250. You cannot send more money until January 8th, even if you receive payments during that time.
Verified Account Limits
Once you verify your identity, limits increase dramatically:
| Time Period | Sending Limit | Receiving Limit |
|---|---|---|
| Per 7 days | $7,500 | Unlimited |
| Per 30 days | No additional limit | Unlimited |
That’s 30 times more sending capacity and unlimited receiving.
How to Verify Your Cash App Account
Increasing your limits takes just a few minutes:
- Open Cash App and tap your profile icon
- Scroll down and select “Personal”
- Tap “Verify Identity”
- Enter your full legal name (as it appears on your ID)
- Enter your date of birth
- Provide the last 4 digits of your Social Security number
- Submit and wait for approval (usually instant)
Cash App uses this information to confirm you’re a real person and comply with financial regulations. Your data is encrypted and secure.
Why verify immediately:
- Unlock $7,500 weekly sending limit
- Receive unlimited money
- Access Cash App’s investing features
- Get approved for the Cash Card (free debit card)
- Enable direct deposit for paychecks
There’s literally no downside to verifying your account, and it only takes 2-3 minutes.
How Long Does It Take to Send Money on Cash App?
Speed varies depending on your payment method and where the money is going.
Sending to Another Cash App User
Instant (less than 1 minute):
- When sending from your Cash App balance
- When sending from a linked debit card
- When sending from a verified bank account during business hours
The recipient sees the money in their account immediately and gets a push notification.
Transferring to Your Bank Account
Standard Transfer (1-3 business days):
- Free option
- Initiated any day of the week
- Money arrives within 1-3 business days
- Best for non-urgent transfers
Instant Deposit (within 30 minutes):
- Costs 0.5% to 1.75% of the transfer amount
- Minimum fee of $0.25
- Money usually arrives in minutes
- Only works with eligible debit cards
- Available 24/7, even on weekends and holidays
Example timing:
- Request standard transfer on Monday morning: Money arrives by Wednesday
- Request standard transfer on Friday afternoon: Money arrives by Tuesday (skips weekend)
- Request instant deposit anytime: Money arrives in 5-30 minutes
What Counts as a Business Day?
Business days are Monday through Friday, excluding federal holidays. Banks don’t process transfers on weekends or holidays like:
- New Year’s Day
- Martin Luther King Jr. Day
- Presidents’ Day
- Memorial Day
- Independence Day
- Labor Day
- Columbus Day
- Veterans Day
- Thanksgiving
- Christmas
Plan your transfers accordingly if you need money by a specific date.
Common Mistakes to Avoid When Sending Money
Learn from others’ mistakes so you don’t make these costly errors.
Mistake 1: Sending to the Wrong Person
This is the number one problem people face. Once you hit send, you cannot cancel or reverse a Cash App payment.
How to prevent this:
- Always double-check the recipient’s $Cashtag
- Verify their profile picture and display name
- Send $1 first if you’re unsure, then send the rest after confirming
- Save frequent contacts so you don’t have to search each time
What to do if you sent money to the wrong person:
- Immediately request a refund from the recipient
- Be polite in your message explaining the mistake
- If they refuse or don’t respond, contact Cash App support
- File a dispute if necessary (though success isn’t guaranteed)
Unfortunately, Cash App treats transactions like cash. Once sent, the money is gone, and you’re relying on the other person’s honesty to return it.
Mistake 2: Falling for Scams
Scammers love Cash App because payments are instant and hard to reverse.
Common Cash App scams:
The “accidental overpayment” scam:
- Someone sends you more money than they should
- They ask you to send back the difference
- Their original payment bounces or gets reversed
- You’ve now sent them your real money
The “prize” or “giveaway” scam:
- You’re told you won money
- But first you need to send a “processing fee”
- You send the fee and never receive the prize
The “verification” scam:
- Someone pretending to be Cash App support
- They ask for your PIN or sign-in code
- They use this to access your account and steal your money
Protection tips:
- Never send money to claim a prize
- Cash App support will never ask for your PIN
- Don’t send money to people you don’t know
- If something seems too good to be true, it probably is
Mistake 3: Using a Debit Card Instead of Your Balance
Remember that 3% fee? It adds up fast.
Bad example: You send $50 to five different friends for concert tickets using your debit card. That’s $250 total, with a $7.50 fee. You just wasted $7.50.
Smart example: Transfer $250 from your bank to Cash App (free, takes 1-3 days). Then send $50 to each friend from your Cash App balance (free). Total fees: $0.
Planning ahead saves money.
Mistake 4: Not Adding Notes to Payments
Adding notes seems optional, but it’s actually important for:
- Remembering what payments were for (especially for taxes)
- Avoiding confusion with roommates or friends
- Having records if you need to dispute something
- Keeping track of business expenses
Make it a habit to always add a short note like “Pizza Tuesday” or “June rent.”
Mistake 5: Ignoring Security Settings
Enable these security features right now:
- Security Lock: Require a PIN, Touch ID, or Face ID to open Cash App
- Notifications: Get alerts for every transaction
- Two-factor authentication: Add extra login protection
- Regular password changes: Update your password every few months
Most account takeovers happen because people don’t use basic security features.
Advanced Tips for Power Users
Once you’re comfortable with the basics, try these pro strategies.
Tip 1: Use Cash App for Budgeting
Create a simple budget system:
- Keep different amounts in your Cash App balance for different purposes
- Use the transaction history to track spending categories
- Set aside money for bills by leaving it in Cash App
- Export your transaction history for tax purposes
Tip 2: Maximize Referral Bonuses
You can earn serious money inviting friends:
- Each referral can earn you $5 (sometimes more during promotions)
- Invite 20 friends = $100 in free money
- Help friends set up their accounts properly so they complete the requirements
- Share your referral code on social media (but don’t spam)
Tip 3: Take Advantage of Cash App Boosts
Cash App offers “Boosts” which are instant discounts at stores and restaurants:
- Get 10% off at Chipotle
- Save $1 on coffee at certain shops
- Receive discounts on gas
- No limit on how many times you can use most Boosts
You need a Cash Card (the free debit card) to access Boosts, but they can save you hundreds per year.
Tip 4: Use Cash App for Small Business
If you run a small business or side hustle:
- Enable a business account for professional features
- Accept customer payments via your $Cashtag
- Track business income separately
- Use transaction history for bookkeeping
- Consider the 2.75% business fee as part of your pricing
It’s simpler than traditional merchant accounts and has no monthly fees.
Tip 5: Automate Regular Payments
For recurring payments like:
- Monthly rent to your landlord
- Weekly payments to a babysitter
- Regular contributions to a group fund
Set a phone reminder to send the payment on the same day each period. Cash App doesn’t have automatic recurring payments yet, but a reminder keeps you consistent.
Troubleshooting Common Payment Issues
Sometimes things go wrong. Here’s how to fix common problems.
“Payment Failed” Error
Possible causes and solutions:
Insufficient funds:
- Check your Cash App balance
- Verify your linked bank account has money
- Wait for pending deposits to clear
Card declined:
- Contact your bank (they might be blocking Cash App)
- Try a different payment method
- Verify your card details are correct
Account limitations:
- You’ve hit your weekly sending limit
- Verify your account to increase limits
- Wait until your limit resets (7 days from first transaction)
Technical issues:
- Close and reopen Cash App
- Update to the latest version
- Check your internet connection
- Try again in a few minutes
“This Payment Cannot Be Completed”
This usually means:
- The recipient’s account is restricted
- You’re trying to send more than allowed
- Cash App detected suspicious activity
Solutions:
- Contact the recipient to verify their account is active
- Send a smaller amount
- Contact Cash App support if you believe it’s an error
Money Sent But Not Received
If you sent money but the recipient didn’t receive it:
- Check your activity feed to confirm it sent
- Ask recipient to check their email and notifications
- Verify you sent to the correct $Cashtag
- Wait 1-2 hours (sometimes there are delays)
- Contact Cash App support if still not resolved
Cannot Add Bank Account or Card
Common fixes:
- Verify your name matches your bank records exactly
- Use your bank’s official name (not a nickname)
- Check that your account/card is eligible
- Remove and re-add the payment method
- Contact your bank to ensure they allow Cash App
Comparing Cash App to Other Payment Methods
Understanding when to use Cash App versus alternatives helps you choose the best option.
| Feature | Cash App | Venmo | Zelle | PayPal | Wire Transfer |
|---|---|---|---|---|---|
| Speed to recipient | Instant | Instant | Instant | Instant | 1-2 days |
| Fees (standard) | Free | Free | Free | Free | $15-$50 |
| Both need app | Yes | Yes | No | Yes | No |
| Weekly limit (verified) | $7,500 | $19,999 | Varies by bank | No limit | No limit |
| Best for | Friends/family | Friends/family | Bank to bank | Online purchases | Large amounts |
| International | No | No | No | Yes | Yes |
Use Cash App when:
- Sending to friends who already have the app
- You want to earn referral bonuses
- You need the payment to arrive instantly
- You want investing features too
Use alternatives when:
- Sending internationally (PayPal)
- Recipient doesn’t want another app (Zelle)
- Sending very large amounts (wire transfer)
- Your bank offers built-in person-to-person transfers
People Also Love :20 Best Cash App Alternatives: Find the Perfect Payment App for Your Needs
How to Transfer Money from Bank Account to Cash App Instantly
Most bank transfers to Cash App take 1-3 business days, but there are ways to get your money faster.
The Reality About Instant Bank Transfers
Here’s the truth: Cash App does not offer truly instant transfers from your bank account to your Cash App balance. Standard transfers always take 1-3 business days, and there’s no paid option to speed this up.
However, you have two workarounds:
Option 1: Use Your Bank Account for Direct Payments
Even without money in your Cash App balance, you can still send money instantly:
- Open Cash App and tap the dollar sign ($)
- Enter the amount you want to send
- Tap “Pay”
- Select your recipient
- Before confirming, tap on your payment method
- Choose your linked bank account instead of Cash App balance
- Complete the payment
The recipient gets the money instantly, even though it takes 1-3 days for Cash App to withdraw from your bank. This works because Cash App fronts the money.
Important limitations:
- Your bank account must be verified
- You need sufficient funds in your bank account
- This counts toward your weekly sending limit
- Some banks may block the transaction initially
Option 2: Link a Debit Card for Instant Funding
If you need money in your Cash App balance right now:
- Link your debit card (not credit card) to Cash App
- Go to the Banking tab ($ icon on the home screen)
- Tap “Add Cash”
- Enter the amount you want to add
- Select your debit card as the source
- Confirm the transaction
The catch: Cash App charges a 3% fee for debit card transactions. On $100, you’ll pay $3. On $500, you’ll pay $15.
Option 3: Get a Cash App Direct Deposit
The smartest way to get money into Cash App instantly is setting up direct deposit:
How to set up direct deposit:
- Tap the Banking tab
- Select “Direct Deposit”
- Tap “Get Account Number”
- Copy your routing and account numbers
- Provide these to your employer or benefits provider
Benefits:
- Paycheck arrives up to 2 days early
- No fees ever
- Money goes straight to your Cash App balance
- Works with paychecks, Social Security, tax refunds, and more
This is a one-time setup that makes all future deposits instant and free.
Best Practice Strategy
For the fastest, cheapest access to funds:
- Set up direct deposit for regular income (free, arrives early)
- Transfer money from bank 1-3 days before you need it (free, requires planning)
- Only use debit card for true emergencies (3% fee, but instant)
How to Send Money to Cash App Without Cash App
This is a common question, but the answer might disappoint you: you cannot send money to someone’s Cash App account if you don’t have Cash App yourself.
Cash App only works as a closed system where both the sender and receiver must have accounts. However, you have several alternatives.
Alternative 1: Download Cash App (Takes 5 Minutes)
The easiest solution is to quickly create a free Cash App account:
- Download Cash App from the App Store or Google Play
- Open the app and enter your phone number or email
- Create a unique $Cashtag (username)
- Link your bank account or debit card
- Send the payment
Total time: 3-5 minutes. Plus, if you use someone’s referral code and send $5 or more, you both get $5 free.
Alternative 2: Use Bank-to-Bank Transfers
If you refuse to download Cash App, use these methods instead:
Zelle (Best Option):
- Built into most major banking apps
- Recipient doesn’t need Zelle app, just their bank’s app
- Transfers arrive in minutes
- Completely free
- Works with Bank of America, Wells Fargo, Chase, and 1,000+ banks
Venmo:
- Similar to Cash App
- You still need to download an app, but some people prefer Venmo
- Free for standard transfers
PayPal:
- Send to anyone with an email address
- They can create a PayPal account to receive it
- Free for friends and family payments
Traditional Bank Transfer:
- Use your bank’s bill pay or wire transfer
- Free or low fee (usually $0-$25)
- Takes 1-3 days
- Works for any bank account
Alternative 3: Other Payment Methods
If the payment is urgent:
- Western Union (cash pickup available)
- MoneyGram (available at many retailers)
- Walmart Money Transfer
- Cash in person
For online purchases:
- PayPal
- Credit/debit card directly
- Apple Pay or Google Pay
Why Cash App Requires Both People to Have Accounts
Cash App operates this way because:
- It’s a closed payment network, not a traditional bank
- Security is enhanced when both parties are verified users
- The company can better prevent fraud
- It keeps fees low (free transfers between users)
If the person you’re trying to pay uses Cash App, downloading it yourself is by far the easiest solution.
How to Transfer Money from Cash App to Bank Account for Free
Getting your money out of Cash App and into your bank account is simple and completely free if you choose the right method.
Standard Transfer (Free Method)
This is the default option that costs nothing:
Step-by-step instructions:
- Open Cash App and tap the Banking tab ($ icon at bottom)
- Tap “Cash Out” at the bottom of the screen
- Enter the amount you want to transfer
- Make sure “Standard” is selected (not “Instant”)
- Choose which bank account to send to
- Tap “Cash Out” to confirm
Important details:
- Cost: $0 (completely free)
- Processing time: 1-3 business days
- Available: Monday-Friday (transfers initiated on weekends process Monday)
- Limit: Up to your entire Cash App balance
When money arrives:
- Request Monday-Thursday morning: Arrives in 1-2 business days
- Request Thursday afternoon-Friday: May take full 3 business days
- Request Saturday-Sunday: Processes Monday, arrives Tuesday-Wednesday
What Counts as Business Days
Banks process transfers Monday through Friday, excluding federal holidays:
- New Year’s Day
- Martin Luther King Jr. Day
- Presidents’ Day
- Memorial Day
- Juneteenth
- Independence Day
- Labor Day
- Columbus Day
- Veterans Day
- Thanksgiving
- Christmas
Plan accordingly if you need money by a specific date.
Instant Deposit (Fast but Costs Money)
If you need money in your bank account right away:
How to use Instant Deposit:
- Follow steps 1-3 above
- Select “Instant” instead of “Standard”
- Choose an eligible debit card (must be Visa or Mastercard)
- Review the fee (0.5% to 1.75% with $0.25 minimum)
- Tap “Cash Out” to confirm
Important details:
- Cost: 0.5% to 1.75% of transfer amount (minimum $0.25)
- Processing time: Within 30 minutes (usually under 10 minutes)
- Available: 24/7, including weekends and holidays
- Requirement: Must have an eligible debit card linked
Fee examples:
- Transfer $20: Pay $0.25 fee (minimum)
- Transfer $100: Pay $0.50 to $1.75 fee
- Transfer $500: Pay $2.50 to $8.75 fee
- Transfer $1,000: Pay $5 to $17.50 fee
How to Avoid Transfer Fees Completely
Strategy 1: Plan ahead Always use standard transfers unless it’s a genuine emergency. Waiting 1-3 days saves you money every time.
Strategy 2: Use the Cash Card instead Rather than cashing out, get a free Cash Card (Cash App’s debit card) and spend directly from your Cash App balance:
- Works anywhere Visa is accepted
- No transfer needed
- Access to discounts through Boosts
- Free ATM withdrawals at in-network ATMs
Strategy 3: Pay bills directly from Cash App Some bills can be paid using your Cash App balance:
- Ask if vendors accept Cash App payments
- Send money to service providers who have Cash App
- Use your Cash Card for online bill payments
Troubleshooting Transfer Issues
“Cash Out Unavailable”
- Your account may need verification
- You might have a pending transaction
- Wait 24 hours and try again
- Contact Cash App support
Transfer Failed
- Check that your bank account is still active
- Verify your bank details are correct
- Ensure sufficient balance in Cash App
- Remove and re-add your bank account
Money Didn’t Arrive
- Check if 3 business days have passed (excluding weekends/holidays)
- Verify you selected the correct bank account
- Look for the transfer in your bank’s pending transactions
- Contact Cash App support after 3 business days
How to Send Money to Cash App from Debit Card
Sending money using your debit card gives you instant access to funds, but it comes with a fee. Here’s everything you need to know.
Adding Your Debit Card to Cash App
Before you can send money from your debit card, you need to link it:
Step-by-step:
- Open Cash App and tap your profile icon
- Scroll down and select “Linked Banks”
- Tap “Link Debit Card”
- Use your phone camera to scan the card (or enter details manually)
- Enter the card number, expiration date, and CVV
- Verify the billing zip code
- Tap “Add Card”
Supported cards:
- Visa debit cards
- Mastercard debit cards
- Discover debit cards
- American Express debit cards (some restrictions)
Not supported:
- Credit cards (except for Bitcoin purchases)
- Prepaid cards (most don’t work)
- Virtual cards (hit or miss)
Sending Money Using Your Debit Card
Once your card is linked:
Method 1: Direct payment to another user
- Tap the dollar sign ($) icon
- Enter the payment amount
- Tap “Pay”
- Select the recipient
- Before confirming, tap the payment method shown
- Choose your debit card from the list
- Review the 3% fee that will be charged
- Tap “Pay” to confirm
Method 2: Add to Cash App balance first
- Tap the Banking tab ($ icon)
- Select “Add Cash”
- Enter the amount
- Choose your debit card as the source
- Confirm the transaction and pay the 3% fee
- Once added, send money from your balance (free)
Understanding the 3% Fee
Cash App charges 3% when sending money directly from a debit card:
Fee examples:
- Send $25: Pay $0.75 fee (total charged: $25.75)
- Send $50: Pay $1.50 fee (total charged: $51.50)
- Send $100: Pay $3 fee (total charged: $103)
- Send $200: Pay $6 fee (total charged: $206)
- Send $500: Pay $15 fee (total charged: $515)
The fee is charged to your debit card along with the payment amount.
When to Use Your Debit Card Despite the Fee
Legitimate reasons:
- True emergency where you need to send money immediately
- Your Cash App balance is zero and you can’t wait 1-3 days for a bank transfer
- You’re sending a very small amount where the fee is minimal
- The recipient needs the money within minutes
Bad reasons:
- You forgot to plan ahead (try to avoid this)
- You’re too impatient to wait for a free transfer
- You didn’t know about the fee (now you do!)
How to Avoid the 3% Debit Card Fee
Best practices:
1. Maintain a Cash App balance Keep some money in your Cash App account from previous payments you’ve received. Send from this balance instead (free).
2. Transfer from bank ahead of time If you know you’ll need to send money soon:
- Transfer from bank to Cash App (free, 1-3 days)
- Wait for it to arrive
- Send from your balance (free)
3. Link your bank account instead For non-urgent payments:
- Send directly from your linked bank account
- Recipient gets money instantly
- Cash App withdraws from your bank in 1-3 days
- No fee charged
4. Use your bank’s payment service Consider Zelle (built into most banking apps):
- Completely free
- Instant transfers
- No download needed if your bank supports it
Debit Card Payment Limits
Debit card transactions have the same limits as other payment methods:
Unverified accounts:
- $250 per 7-day period
Verified accounts:
- $7,500 per 7-day period
Plus your debit card’s own daily limits set by your bank (typically $2,500-$5,000).
How to Receive Money on Cash App for the First Time
Receiving your first payment on Cash App is exciting and simple. Here’s exactly what to expect and how to prepare.
Before You Can Receive Money
Make sure you’ve completed these basic setup steps:
1. Download and install Cash App
- Available free on App Store (iPhone) or Google Play (Android)
- Requires iOS 13.0 or later, or Android 5.0 or later
- Takes about 2 minutes to download
2. Create your account
- Enter your phone number or email
- Verify with the code sent to you
- Create a password
- Choose a unique $Cashtag (your username)
3. Link a payment method While you don’t need a linked bank or card to receive money, you’ll need one to cash out:
- Add your bank account (recommended, free transfers)
- Or add a debit card (faster but fees apply)
How to Receive Your First Payment
Option 1: Share your $Cashtag
Your $Cashtag is your unique username (like $JohnSmith2025). Anyone can send you money using this.
To share it:
- Tap your profile icon in the top-right corner
- Your $Cashtag appears near the top
- Tap to copy it
- Send it to the person who wants to pay you (via text, email, etc.)
They simply enter your $Cashtag when sending money, and you receive it instantly.
Option 2: Share your phone number or email
If someone has your phone number or email address that’s linked to Cash App:
- They can type it when sending money
- Cash App finds your account automatically
- You receive the payment
Option 3: Show your QR code in person
For in-person payments:
- Tap your profile icon
- Tap the QR code symbol
- Show your unique QR code to the person
- They scan it with their Cash App camera
- They enter the amount and send
This is perfect for situations like:
- Selling items on Facebook Marketplace
- Getting paid for services (tutoring, babysitting)
- Splitting bills at restaurants
- Receiving payment for freelance work
What Happens When You Receive Money
Instant notification: You’ll get a push notification immediately saying “[Name] paid you $XX.XX”
Where the money goes: The payment appears in your Cash App balance right away. You can:
- Leave it in Cash App to send to others (free)
- Transfer to your bank account (free, 1-3 days)
- Instant transfer to debit card (fee applies)
- Spend it using your Cash Card
No fee for receiving: Unlike some payment services, Cash App never charges you to receive money from friends and family. It’s completely free.
First-Time Receiving Limits
Even without verification, you can receive a lot of money:
Unverified accounts:
- Unlimited receiving for 7-day periods
- Maximum $1,000 receiving in 30-day periods
Verified accounts:
- Completely unlimited receiving
To verify your account:
- Tap profile icon → Personal
- Select “Verify Identity”
- Provide full name, date of birth, last 4 of SSN
- Get approved in minutes
First Payment Checklist
Before receiving your first payment, verify:
- [ ] Cash App is downloaded and account created
- [ ] You’ve chosen a unique $Cashtag
- [ ] Your phone number or email is verified
- [ ] You know your $Cashtag to share with the sender
- [ ] Notifications are enabled so you know when money arrives
- [ ] You’ve linked a bank account or debit card for cashing out later
What to Do After Receiving Your First Payment
Option 1: Leave it in Cash App If you plan to send money to others soon, just leave it in your balance. This gives you free funds to send later.
Option 2: Cash out to your bank
- Tap the Banking tab ($ icon)
- Tap “Cash Out”
- Enter the amount
- Select “Standard” for free transfer (1-3 days)
- Confirm
Option 3: Get a Cash Card Order the free Cash App Visa debit card:
- Tap the Cash Card tab
- Follow prompts to order
- Card arrives in 7-10 days
- Activate and use your Cash App balance anywhere
Common First-Time Receiving Questions
“How will I know when money arrives?” You’ll get an instant push notification and see it in your activity feed.
“Can someone send me money before I link a bank account?” Yes. You can receive unlimited money without linking anything. You only need a linked account to cash out.
“What if I give the wrong $Cashtag?” The sender will get an error that the account doesn’t exist. Double-check you’re sharing the correct $Cashtag.
“Is there a minimum amount I can receive?” No minimum. People can send you as little as $0.01 if they want.
“Do I pay taxes on money I receive?” For personal payments (gifts, reimbursements, bill splitting), no. For business income, you’re responsible for reporting it on your taxes. Cash App provides tax forms if you receive $600+ in business transactions.
Cash App Download: Getting Started
Downloading Cash App is the first step to sending and receiving money. Here’s everything you need to know.
How to Download Cash App on iPhone
Step-by-step for iOS:
- Open the App Store on your iPhone or iPad
- Tap the search icon at the bottom
- Type “Cash App” in the search bar
- Look for the app by “Square, Inc.” with the green icon and white dollar sign
- Tap Get (or the cloud icon if you’ve downloaded it before)
- Authenticate with Face ID, Touch ID, or your Apple ID password
- Wait for the download to complete (usually 30 seconds to 2 minutes)
- Tap Open or find the app on your home screen
System requirements:
- iPhone, iPad, or iPod touch
- iOS 13.0 or later
- About 200 MB of free storage space
- Internet connection (Wi-Fi or cellular)
Official App Store link: Search “Cash App Square” in the App Store or look for the green icon with a white “$” symbol.
How to Download Cash App on Android
Step-by-step for Android:
- Open the Google Play Store on your Android device
- Tap the search bar at the top
- Type “Cash App” and tap search
- Select “Cash App” by Square, Inc.
- Tap the green Install button
- Accept the permissions requested
- Wait for the download and installation (1-3 minutes)
- Tap Open or find the app in your app drawer
System requirements:
- Android smartphone or tablet
- Android 5.0 (Lollipop) or later
- About 150 MB of free storage space
- Internet connection
Important: Only download from the official Google Play Store. Avoid third-party app stores to prevent malware.
First-Time Setup After Downloading
Once Cash App is installed:
1. Open the app Tap the Cash App icon with the green background and white dollar sign.
2. Enter your information
- Phone number or email address
- Verify with the code sent to you
- Create a secure password
- Choose a unique $Cashtag
3. Customize your account
- Add a profile picture (optional)
- Set up security features (PIN, Face ID, Touch ID)
- Link your bank account or debit card
4. Complete verification (recommended)
- Provide your full legal name
- Enter date of birth
- Add last 4 digits of Social Security number
- Increases your limits from $250/week to $7,500/week
Total setup time: 5-10 minutes
Verifying You Downloaded the Real Cash App
How to confirm it’s legitimate:
On iPhone:
- Developer: “Square, Inc.”
- Bundle ID: com.squareup.cash
- Size: Around 200 MB
- Green icon with white $ symbol
- Ratings: 4.5+ stars with millions of reviews
On Android:
- Developer: “Block, Inc.” (formerly Square)
- Package: com.squareup.cash
- Size: Around 150 MB
- Same green icon
- Ratings: 4.4+ stars with millions of reviews
Red flags for fake apps:
- Developer name is NOT Square or Block
- Icon looks slightly different
- Very few or suspicious reviews
- Requests unusual permissions upfront
- Available on unofficial app stores
Download Troubleshooting
“This app is not available in your country” Cash App only works in the US and UK. If you’re outside these countries, you’ll see this error.
“Your device is not compatible” Update your phone’s operating system:
- iPhone: Go to Settings → General → Software Update
- Android: Settings → System → System Update
“Cannot download, insufficient storage” Free up space by:
- Deleting unused apps
- Clearing cache
- Removing old photos/videos
- Moving files to cloud storage
“Download stuck at waiting”
- Check your internet connection
- Restart your device
- Close and reopen the app store
- Try downloading on Wi-Fi instead of cellular
Is Cash App Download Free?
Yes, 100% free.
- No cost to download
- No cost to create an account
- No monthly fees
- No subscription required
Cash App makes money from:
- 3% fee on instant debit card transfers
- Small fees on instant deposits
- Business account fees (if you enable business features)
- Bitcoin transaction fees
- Stock investing fees
But basic peer-to-peer payments are completely free if you use your Cash App balance or bank account.
Cash App Login: Accessing Your Account
Once you’ve downloaded Cash App and created an account, logging in is simple. Here’s how to access your account and what to do if you have issues.
How to Log In to Cash App
Standard login process:
- Open the Cash App on your phone
- Enter your credentials:
- Your phone number or email
- Your password or PIN
- Authenticate if enabled:
- Face ID (iPhone with Face ID)
- Touch ID (iPhone with Home button)
- Fingerprint (Android)
- PIN code
- Access granted – you’ll see your home screen
First-time login after download: If you just created your account, you’ll stay logged in automatically. You won’t need to log in again unless you:
- Log out manually
- Uninstall and reinstall the app
- Switch devices
- Change your password
Enabling Security Lock for Login
Make your account more secure by requiring authentication every time you open the app:
How to set up security lock:
- Open Cash App and tap your profile icon
- Scroll down to Privacy & Security
- Select Security Lock
- Choose your preferred method:
- PIN – Create a 4-digit code
- Face ID – Uses facial recognition (newer iPhones)
- Touch ID – Uses fingerprint (iPhones with Home button)
- Fingerprint – Uses fingerprint scanner (Android)
- Confirm your selection
Now every time you open Cash App, you’ll need to authenticate.
Recommended: Always enable security lock. This protects your money if someone gets access to your unlocked phone.
Staying Logged In vs. Logging Out
Cash App keeps you logged in by default, which is convenient but requires good security practices.
Benefits of staying logged in:
- Instant access when you need to send money
- Receive real-time notifications
- Faster transaction processing
When to log out:
- You’re sharing a device with others
- Your phone was stolen or lost
- You suspect unauthorized access
- You’re selling or giving away your phone
How to log out:
- Tap your profile icon
- Scroll to the bottom
- Tap Sign Out
- Confirm
You’ll need your email/phone and password to log back in.
What to Do If You Forgot Your Password
Password recovery steps:
- Open Cash App
- On the login screen, tap Forgot Password?
- Enter your email or phone number
- Tap Send Code
- Check your email or text messages for a verification code
- Enter the code in the app
- Create a new password
- Confirm the new password
- Log in with your new credentials
Password requirements:
- At least 8 characters
- Mix of letters and numbers recommended
- Avoid using the same password as other accounts
- Don’t use easily guessed passwords (birthdays, “password123”, etc.)
Login Issues and Solutions
“Incorrect password” error:
- Double-check caps lock is off
- Make sure you’re entering the right email/phone
- Try the forgot password process
- Wait a few minutes if you’ve had multiple failed attempts
“Account locked” message:
- This happens after too many wrong password attempts
- Wait 24 hours and try again
- Or use the forgot password option to reset
- Contact Cash App support if still locked after reset
“Unable to verify your account”:
- Check your internet connection
- Make sure you’re using the correct phone number or email
- Verify your phone number is still active
- Try restarting the app
Two-factor authentication code not arriving:
- Check spam/junk folders for email codes
- Verify your phone number is correct
- Make sure you have cell service
- Request a new code (usually can resend after 60 seconds)
App keeps logging you out:
- Update Cash App to the latest version
- Clear app cache (Settings → Apps → Cash App → Clear Cache on Android)
- Reinstall the app
- Check if your device is running low on memory
Logging In on a New Device
If you get a new phone or need to access Cash App on a different device:
Steps to log in on new device:
- Download Cash App on the new device
- Open the app
- Tap Sign In (not “Sign Up”)
- Enter your email or phone number
- Enter your password
- Complete verification:
- You’ll receive a security code via text or email
- This is a one-time verification for new devices
- Enter the code to confirm it’s really you
- Set up biometric authentication on the new device
Security notice: Cash App may send you a notification saying “New login detected” when you access your account from a different device. This is normal and helps you spot unauthorized access.
Managing Multiple Devices
Can you be logged in on multiple devices? Yes, but with limitations:
- You can be logged into Cash App on multiple devices
- However, only one device can actively use the account at a time
- If you initiate a transaction on one device, other devices may be temporarily logged out
Best practice: Use Cash App primarily on one device (your main phone) for security and simplicity.
Login Security Best Practices
1. Use a strong, unique password
- Never reuse passwords from other accounts
- Use a password manager to generate and store complex passwords
- Change your password every 3-6 months
2. Enable two-factor authentication
- Adds extra layer of security
- Requires both password and verification code
- Makes unauthorized access nearly impossible
3. Don’t share login credentials
- Never give your password to anyone
- Cash App support will never ask for your password
- Be wary of phishing attempts
4. Monitor login activity
- Check for unfamiliar notifications
- Review recent transactions regularly
- Report suspicious activity immediately
5. Use biometric authentication
- Face ID, Touch ID, or fingerprint is more secure than PIN
- Harder for someone to bypass
- More convenient for you
Logging In Online (Web Version)
Important limitation: Cash App does not have a full web login for regular users. You cannot access your Cash App account through a web browser like you can with PayPal or Venmo.
What you CAN do online:
- View payment receipts sent via email
- Manage Cash App business account (if you have one)
- Check transaction confirmations
What you CANNOT do online:
- Send or receive money
- View your balance
- Manage payment methods
- Access most account features
Cash App is primarily mobile-only, which actually enhances security since there are fewer access points for hackers.
How to Send Money on Cash App on Computer
Many people prefer managing finances on a computer with a bigger screen and keyboard. Unfortunately, Cash App has limited computer functionality.
The Reality: Cash App Is Mobile-Only
Important fact: Cash App does not offer a full desktop application or web interface for personal accounts. You cannot send money on Cash App using a computer.
The service is designed exclusively as a mobile app for smartphones and tablets. This is an intentional design choice by Cash App to:
- Enhance security (fewer access points)
- Reduce fraud (harder to spoof mobile app)
- Simplify user experience
- Encourage mobile-first financial management
What You CAN Do on Computer
While you can’t send money, you can handle a few tasks:
1. Create a business account (cash.app/business) If you run a business, you can access limited features:
- View transaction history
- Download reports
- Manage business settings
- Track customer payments
2. View email receipts Every transaction sends you an email receipt. You can:
- Access these on your computer
- Forward to others
- Save for record-keeping
- Print for tax purposes
3. Manage Bitcoin investments Through Cash App’s website, Bitcoin holders can:
- View Bitcoin balance
- Check price charts
- See transaction history
- But cannot buy/sell (mobile only)
4. Access support resources At cash.app/help you can:
- Read FAQs
- Find troubleshooting guides
- Submit support tickets
- Access safety information
Workarounds to Use Cash App on Computer
If you really need to access Cash App from your computer, try these methods:
Option 1: Android Emulator (Advanced Users)
Run Android apps on your Windows or Mac computer:
Popular emulators:
- BlueStacks (most user-friendly)
- NoxPlayer
- MEmu Play
Steps:
- Download and install an Android emulator
- Set up the emulator with a Google account
- Open Google Play Store within the emulator
- Download Cash App
- Log in to your Cash App account
- Use Cash App as if on a phone
Warnings:
- This violates Cash App’s terms of service
- Your account could be suspended
- Security risks from third-party software
- Not recommended for regular use
Option 2: Phone Screen Mirroring
Mirror your phone screen to your computer:
For iPhone:
- Use QuickTime Player (Mac only)
- Connect iPhone via cable
- File → New Movie Recording
- Select iPhone as source
- Control Cash App on phone while viewing on computer
For Android:
- Use Your Phone app (Windows)
- Scrcpy (free, open-source)
- Vysor
- Connect phone and mirror screen
Benefits:
- Completely safe (you’re using the official app)
- No terms of service violations
- Bigger screen for viewing
- Still need to physically use your phone
Option 3: Remote Desktop Access
Access your phone remotely:
- TeamViewer (supports mobile access)
- Chrome Remote Desktop
- AnyDesk
Process:
- Install remote access app on phone and computer
- Connect devices
- Control phone from computer
- Use Cash App normally
Limitations:
- Requires setup and technical knowledge
- May be laggy
- Still using phone, just remotely
Why Cash App Won’t Add Web Access
Several reasons explain Cash App’s mobile-only approach:
1. Security concerns
- Web browsers are more vulnerable to hacking
- Phishing websites can steal credentials
- Mobile apps have better built-in security
2. Fraud prevention
- Harder to create fake mobile apps vs. fake websites
- Mobile device authentication (biometrics) is more secure
- Transaction patterns are easier to monitor on mobile
3. User behavior
- Most peer-to-peer payments happen on-the-go
- Mobile is more convenient for quick transactions
- Users want instant access in daily situations
4. Development resources
- Maintaining web, iOS, and Android versions is expensive
- Mobile-first keeps the product focused
- Better to perfect one platform than spread resources
Alternatives That Work on Computer
If you need desktop access for money transfers, consider these alternatives:
Zelle:
- Built into most bank websites
- Access from computer through online banking
- Instant transfers
- Free
PayPal:
- Full website functionality
- Send/receive money from any browser
- Mobile app also available
- Works internationally
Venmo:
- Has website at venmo.com
- Send/receive payments from desktop
- View transaction feed
- Manage account settings
Bank bill pay:
- Use your bank’s website
- Send checks or electronic payments
- Set up recurring payments
- Completely free usually
Wire transfers:
- Through your bank’s website
- For larger amounts
- Same-day or next-day delivery
- Higher fees ($15-$50 typically)
Best Practices If You Must Use Cash App
Since Cash App is mobile-only, optimize your mobile experience:
1. Use a tablet for bigger screen
- Download Cash App on an iPad or Android tablet
- Same app, larger display
- Easier to read and navigate
- Still portable
2. Enable accessibility features
- Increase text size in Cash App settings
- Use phone’s zoom features
- Enable screen reader if needed
3. Keep detailed records elsewhere
- Export transaction history (via email)
- Maintain a spreadsheet on computer
- Save email receipts automatically
- Use accounting software that imports from email
4. Set up your computer for related tasks
- Manage budgets on computer (Mint, YNAB)
- Track expenses in spreadsheets
- Save Cash App receipts to cloud storage
- Access bank accounts online for verification
Future Possibilities
Will Cash App add web access?
While there’s no official announcement, here’s what might happen:
Unlikely in near future:
- Cash App’s parent company (Block) hasn’t indicated plans
- Competitors like Zelle have web access but Cash App differentiates by being mobile-focused
- Security and fraud prevention are easier on mobile
Possible compromises:
- View-only web access (check balance, see history)
- Business account features expand online
- Read-only dashboard for record-keeping
- Limited transaction approval from desktop
For now, accept that Cash App is mobile-only and plan accordingly. Keep your phone charged, secure the app with biometric authentication, and use alternative services when you need desktop access.
Your Next Steps: Sending Money Like a Pro
Now you know everything about sending money on Cash App. Here’s how to put this knowledge into action:
This week:
- Verify your account if you haven’t already (unlocks $7,500 limit)
- Transfer some money from your bank to build a Cash App balance
- Enable security features (PIN, Touch ID, notifications)
- Add notes to your next three payments for better record-keeping
- Practice sending a small amount to yourself or a trusted friend
This month:
- Help three friends set up Cash App (earn referral bonuses)
- Review your transaction history and export for records
- Calculate how much you could save by avoiding debit card fees
- Set up a system for tracking shared expenses
- Consider getting the Cash Card for Boosts and ATM access
Ongoing habits:
- Always double-check recipients before sending
- Use your Cash App balance instead of debit cards
- Add notes to every transaction
- Check for security alerts weekly
- Keep your app updated
Final Thoughts
Sending money on Cash App is incredibly simple once you understand the system. The key is choosing the right payment method, avoiding unnecessary fees, and following security best practices.
Remember these core principles:
- Send from your balance or bank account to avoid fees
- Always verify recipients before hitting send
- Plan ahead for large transfers
- Enable all security features
- Verify your account to unlock higher limits
Cash App has revolutionized how Americans send money to each other. No more writing checks, making ATM runs, or dealing with complicated wire transfers. Just a few taps and the money is there.
The difference between a casual Cash App user and a power user comes down to knowledge. You now have that knowledge. Use it to send money smarter, save on fees, and avoid common mistakes that cost others time and money.
Start with your next payment. Apply what you’ve learned, and sending money on Cash App will become second nature.

