Table of Contents
Most Americans are one unexpected expense away from financial disaster. A broken car, medical emergency, or job loss can send you spiraling into debt if you don’t have savings to fall back on.
The harsh reality: 40% of Americans couldn’t cover a $1,000 emergency without borrowing money or using a credit card. But it doesn’t have to be this way.
This guide covers two powerful saving strategies that create financial security: emergency funds for unexpected crises and sinking funds for planned expenses. Together, these strategies protect you from life’s surprises while helping you afford the things you actually want.
Whether you’re starting from zero or want to improve your existing savings system, you’ll learn exactly how to build these funds, where to keep them, and how much you actually need.
Why Traditional Saving Advice Fails Most People
Before we dive into specific saving strategies, let’s address why most people struggle to save money.
The problem with “just save more” advice:
Traditional financial advice says “save 20% of your income” or “have six months of expenses saved.” While this is mathematically correct, it’s practically useless for most people because:
- It doesn’t tell you HOW to save
- It ignores the reality of living paycheck to paycheck
- It treats all expenses as equal (they’re not)
- It doesn’t account for irregular income
- It creates an overwhelming goal that feels impossible
What actually works:
Instead of vague goals, you need specific saving strategies:
- Emergency funds for true emergencies you can’t predict
- Sinking funds for expenses you know are coming
- Clear systems that automate the process
- Realistic starting points that build momentum
Let’s break down each strategy in detail.
Emergency Funds: Your Financial Safety Net
An emergency fund is money set aside specifically for unexpected expenses or financial crises. It’s your buffer between you and debt when life throws curveballs.
What Counts as an Emergency?
Understanding what qualifies as an emergency is critical. An emergency fund is NOT for:
❌ Black Friday sales
❌ New phone because you want an upgrade
❌ Vacation you didn’t plan for ❌ Impulse purchases
❌ Regular annual expenses (car registration, holiday gifts)
An emergency fund IS for:
✅ Job loss or reduced income
✅ Medical emergencies not covered by insurance
✅ Emergency car repairs needed to get to work
✅ Urgent home repairs (broken furnace, roof leak)
✅ Emergency travel (family crisis)
✅ Unexpected veterinary bills for sick pets
✅ Sudden major appliance failure (water heater, refrigerator)
The test: Would this expense create a financial crisis if you couldn’t borrow money? If yes, it’s an emergency.
How Much Should Your Emergency Fund Be?
The standard advice is 3-6 months of expenses, but the right amount depends on your situation.
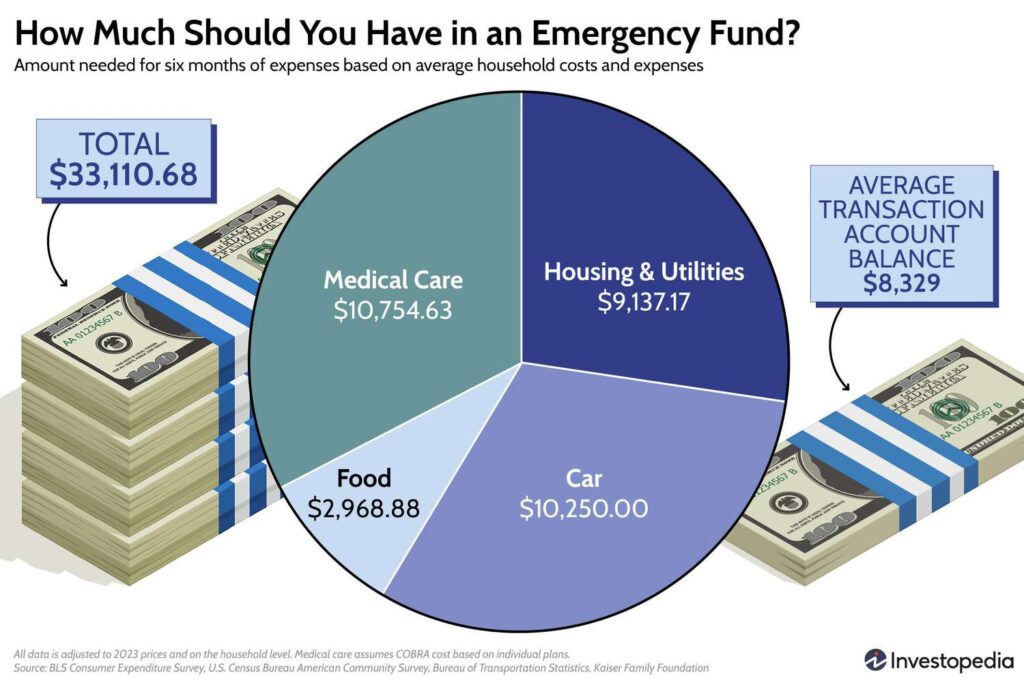
Emergency Fund Targets by Situation:
| Your Situation | Recommended Amount | Why |
|---|---|---|
| Stable job, dual income | 3 months expenses | Lower risk, can rebuild quickly |
| Stable job, single income | 4-6 months expenses | Higher risk, sole provider |
| Unstable job or industry | 6-9 months expenses | Job loss more likely |
| Self-employed/freelance | 9-12 months expenses | Irregular income, no unemployment benefits |
| Commission-based income | 6-9 months expenses | Income fluctuates significantly |
| Chronic health issues | 6-9 months expenses | Higher medical expense risk |
| Single parent | 6-9 months expenses | Sole financial responsibility |
| Homeowner | 6 months expenses + $5,000 | Home repairs can be expensive |
How to calculate your target:
Step 1: Calculate monthly essential expenses Add up only what you MUST pay each month:
- Housing (rent/mortgage)
- Utilities (electric, gas, water)
- Food (groceries, not dining out)
- Transportation (car payment, insurance, gas)
- Insurance (health, life)
- Minimum debt payments
- Essential childcare
Example:
- Rent: $1,500
- Utilities: $150
- Groceries: $400
- Car payment: $350
- Car insurance: $125
- Gas: $150
- Health insurance: $200
- Minimum credit card: $100 Total monthly essentials: $2,975
Step 2: Multiply by target months $2,975 × 6 months = $17,850 emergency fund goal
Note: This is ONLY essential expenses. In an emergency, you’d cut wants like streaming services, dining out, and entertainment.
The Baby Steps Approach to Building Emergency Funds
Staring at a $17,850 goal feels overwhelming. Break it into manageable milestones:
Milestone 1: $500 Starter Emergency Fund
- Covers minor emergencies (flat tire, small medical bill)
- Achievable in 1-2 months for most people
- Prevents new debt for small surprises
- Builds momentum and confidence
Milestone 2: $1,000 Basic Emergency Fund
- Handles most common emergencies
- Standard recommendation from Dave Ramsey
- Covers things like car repairs, minor home issues
- Realistic first goal while paying off debt
Milestone 3: One Month of Expenses
- First major milestone
- Provides breathing room for job loss
- Covers major unexpected expenses
- Usually $2,000-$4,000 for most households
Milestone 4: Three Months of Expenses
- Minimum recommended for stable situations
- Allows time to find new job if laid off
- Handles major emergencies without panic
- Typically $6,000-$15,000
Milestone 5: Six Months of Expenses (Full Emergency Fund)
- Gold standard for most people
- True financial security
- Can weather extended job loss
- Sleep-better-at-night peace of mind
Milestone 6: Beyond Six Months (Optional)
- For self-employed, single income, high risk
- 9-12 months provides maximum security
- Only after other financial goals are met
Pro tip: Celebrate each milestone. Hitting $1,000 saved is a huge accomplishment worthy of recognition.
Where to Keep Your Emergency Fund
Your emergency fund needs to be accessible but not too accessible. Here’s the hierarchy:
Best Options (Ranked):
1. High-Yield Savings Account (HYSA)
- APY: 4.0% – 5.5% (as of 2025)
- Accessibility: 1-3 business days to transfer to checking
- Safety: FDIC insured up to $250,000
- Best for: Most people’s emergency funds
Top HYSA options:
- Marcus by Goldman Sachs
- Ally Bank
- American Express Personal Savings
- Capital One 360 Performance Savings
- Discover Online Savings
2. Money Market Account
- APY: 3.5% – 5.0%
- Accessibility: Often includes debit card or check writing
- Safety: FDIC insured
- Best for: Those who want slightly easier access
3. Regular Savings Account at Your Bank
- APY: 0.01% – 0.5% (much lower)
- Accessibility: Immediate transfer to checking
- Safety: FDIC insured
- Best for: Convenience if you value same-bank access over interest
Avoid These for Emergency Funds:
❌ Checking account: Too accessible, easy to accidentally spend
❌ Cash at home: No interest, risk of theft or loss, too tempting
❌ CDs (Certificates of Deposit): Early withdrawal penalties defeat the purpose
❌ Stocks or investments: Value fluctuates, could be down when you need money
❌ Crypto: Extremely volatile, not suitable for emergency funds
❌ Retirement accounts: Penalties and taxes for early withdrawal
The sweet spot: High-yield savings account at an online bank. You earn 4-5% interest, money is safe, and it takes 2-3 days to access (preventing impulse spending while remaining available for true emergencies).
How to Build Your Emergency Fund Fast
Strategy 1: Automate Your Savings
The most effective saving strategy is automation:
Set up automatic transfers:
- Choose an amount you can save per paycheck ($25, $50, $100, etc.)
- Set up automatic transfer from checking to savings on payday
- Treat it like a bill you must pay
- Don’t touch the savings account
Example schedule:
- Get paid every two weeks
- Automatic $100 transfer to HYSA on each payday
- $200/month = $2,400/year in emergency savings
- Hit $1,000 milestone in 5 months
Strategy 2: Save All Windfalls
Put 100% of unexpected money into emergency fund:
- Tax refunds
- Work bonuses
- Cash gifts
- Rebates
- Side hustle income (until fund is complete)
Example:
- Tax refund: $2,000
- Birthday money: $200
- Sold old furniture: $300
- Work bonus: $500 Total windfall: $3,000 → straight to emergency fund
Strategy 3: The Savings Challenge Method
Make saving a game with challenges:
52-Week Challenge:
- Week 1: Save $1
- Week 2: Save $2
- Week 3: Save $3
- Continue increasing by $1 weekly
- By week 52: Saving $52
- Total saved: $1,378
Reverse 52-Week Challenge:
- Start with $52 in week 1 (when motivation is high)
- Decrease by $1 each week
- End with $1 in week 52 (when it’s easier)
- Total saved: $1,378
Round-Up Challenge:
- Round up every purchase to nearest dollar
- Transfer the difference to savings
- Spend $3.47 on coffee → transfer $0.53 to savings
- Adds up to $50-100/month
Strategy 4: Cut Expenses Temporarily
Aggressive temporary cuts to jumpstart emergency fund:
30-Day Spending Freeze:
- No discretionary spending for 30 days
- Only essentials (housing, groceries, utilities, gas)
- Cancel all subscriptions temporarily
- No dining out, shopping, or entertainment
- Save everything else
Example savings:
- Dining out normally: $300/month
- Entertainment: $150/month
- Shopping: $200/month
- Subscriptions: $50/month Total saved in one month: $700
Strategy 5: Increase Income Temporarily
Boost income specifically for emergency fund:
Quick income ideas:
- Overtime at work
- Sell unused items (clothes, electronics, furniture)
- Freelance or gig work (Uber, TaskRabbit, Fiverr)
- Seasonal work (retail during holidays)
- Rent out parking space or spare room
- Dog walking or pet sitting
Time-bound goal: “I’ll drive for Uber every Saturday for 3 months to hit my $1,000 emergency fund goal.”
Real-World Example: Building an Emergency Fund
Sarah’s situation:
- Take-home income: $3,200/month
- Essential expenses: $2,600/month
- Currently: $0 in savings
- Goal: $10,000 emergency fund (4 months expenses)
Sarah’s plan:
Phase 1: First $1,000 (Months 1-3)
- Automatic savings: $100/paycheck = $200/month
- Round-up app: $30/month
- 30-day spending freeze: $400 (one month only)
- Sold old clothes and electronics: $370 Total: $1,000 in 3 months
Phase 2: Next $2,500 (Months 4-9)
- Automatic savings: increased to $250/month
- Tax refund: $1,800
- Birthday money: $200
- Sold furniture: $250 Total: $1,000 + $2,500 = $3,500 after 9 months
Phase 3: Final $6,500 (Months 10-24)
- Automatic savings: $300/month
- Got raise, increased to $400/month (month 18)
- Work bonus: $1,000
- Side hustle (weekends): $150/month Total: Full $10,000 in 24 months
Sarah built her complete emergency fund in 2 years through consistent automation plus strategic windfall allocation.
What to Do After Your Emergency Fund Is Complete
Once you’ve hit your emergency fund target:
1. Stop contributing (redirect money elsewhere) Move automatic transfers to other goals:
- Pay off high-interest debt
- Max out retirement contributions
- Save for down payment
- Build sinking funds (next section)
2. Maintain the fund Only replenish if you use it:
- Used $2,000 for car repair → rebuild to full amount
- Pause other savings goals temporarily
- Get back to target, then resume other goals
3. Consider higher-interest options Once fully funded, you can be slightly less liquid:
- Put portion in CD ladder (staggered maturity dates)
- I-Bonds for inflation protection
- Still keep 3 months in HYSA, rest in slightly less liquid options
4. Increase for life changes Adjust target when circumstances change:
- Got married → increase
- Had a baby → increase
- Bought a house → increase significantly
- Lost second income → increase
- More stable job → can reduce slightly
Sinking Funds: Planning for Known Expenses
While emergency funds cover unpredictable crises, sinking funds are for expenses you know are coming but don’t happen every month.
What Is a Sinking Fund?
A sinking fund is a dedicated savings account (or category) where you set aside money gradually for a specific planned expense.
The concept: Instead of scrambling for money when your car insurance is due or holidays arrive, you save a little each month so the money is ready when needed.
Formula: Total Cost ÷ Months Until Needed = Monthly Contribution
Example:
- Car insurance: $1,200/year
- Months until due: 12
- Monthly sinking fund contribution: $1,200 ÷ 12 = $100/month
When insurance is due, you have $1,200 saved and ready. No stress, no credit card debt.
Common Sinking Fund Categories
Annual or Semi-Annual Expenses:
1. Car Maintenance and Repairs
- Oil changes, tire rotations, new tires
- Average: $100-150/month
- When major repair hits, you’re prepared
2. Insurance Premiums
- Car insurance (if paid annually or semi-annually)
- Homeowners/renters insurance
- Life insurance
- Umbrella policies
3. Property Taxes
- If not included in mortgage escrow
- Can be thousands of dollars
- Divide annual bill by 12
4. HOA Fees
- If paid quarterly or annually
- Special assessments
5. Car Registration and License Renewals
- DMV fees
- Vehicle registration
- Driver’s license renewals
Seasonal Expenses:
6. Holiday and Gift Giving
- Christmas/Hanukkah gifts
- Birthday presents
- Wedding gifts
- Baby showers
- Average family: $100-200/month
7. Back-to-School
- Clothes, supplies, fees
- Usually August/September
- Save $50-100/month starting in January
8. Summer Activities
- Camps, vacations, activities
- Kids’ summer expenses
- Higher utility bills from A/C
Irregular but Expected:
9. Home Maintenance and Repairs
- HVAC service
- Appliance replacement
- Roof repairs
- Painting
- Recommended: 1-2% of home value annually
10. Medical Expenses
- Annual deductible
- Planned procedures
- Prescriptions
- Dental work
- Vision care
11. Veterinary Care
- Annual checkups
- Vaccinations
- Unexpected pet illnesses
- Recommended: $50-100/month
12. Technology and Electronics
- Computer replacement (every 3-5 years)
- Phone upgrades
- Appliance replacement
- Divide replacement cost by expected lifespan
Lifestyle and Goals:
13. Vacation Fund
- Annual trip or multiple smaller trips
- Save monthly to avoid vacation debt
- Average: $200-500/month depending on goals
14. Clothing
- Seasonal wardrobe updates
- Professional work clothes
- Kids’ growing out of clothes
- Average: $50-150/month
15. Furniture and Home Decor
- Replacement furniture
- Home improvements
- Redecorating
- Average: $50-100/month
16. Wedding, Baby, or Major Life Event
- Your own wedding
- Someone else’s destination wedding
- Baby costs (if planning)
- Large milestone celebrations
How to Calculate Sinking Fund Amounts
Step-by-step process:
1. Identify the expense Be specific: “Car insurance premium” not just “car stuff”
2. Determine the total cost Look at past years or get quotes:
- Car insurance: $1,200/year
- Holiday gifts: $1,500/year
- Vacation: $3,000/year
3. Decide the time frame When do you need this money?
- Car insurance: Annual (12 months)
- Holiday gifts: By December (varies by current month)
- Vacation: 18 months from now
4. Calculate monthly amount Total Cost ÷ Months = Monthly Contribution
Example calculations:
| Expense | Total Cost | Months | Monthly Amount |
|---|---|---|---|
| Car insurance | $1,200 | 12 | $100 |
| Holiday gifts | $1,500 | 12 | $125 |
| Vacation | $3,000 | 18 | $167 |
| Car repairs | Unknown | Ongoing | $100 |
| Home repairs | $2,000/year | 12 | $167 |
| TOTAL | $659/month |
This family needs to set aside $659/month across all sinking funds to be fully prepared.
5. Adjust based on budget reality
If you can’t afford all sinking funds:
- Prioritize required expenses (insurance, car maintenance)
- Reduce discretionary amounts (vacation, gifts)
- Start with smaller amounts and increase gradually
- Choose 3-5 most important categories to start
Sinking Funds vs. Emergency Fund: Key Differences
| Aspect | Emergency Fund | Sinking Funds |
|---|---|---|
| Purpose | Unexpected crises | Planned expenses |
| When used | Can’t predict | Know when needed |
| Amount | 3-6 months expenses | Varies by category |
| Frequency of use | Rarely (emergencies only) | Regularly (as expenses occur) |
| Replenishment | Only if used | Continuous, then refill |
| Number of funds | One fund | Multiple categories |
| Account type | High-yield savings | Can be sub-accounts or envelopes |
| Liquidity needed | Medium (2-3 day access) | High for some, low for others |
Example distinction:
❌ Not an emergency (use sinking fund): “My car insurance is due and I don’t have money for it.” → This is predictable. Should have a sinking fund.
✅ True emergency (use emergency fund): “My transmission died and I need $3,000 to repair it so I can get to work.” → This is unpredictable and urgent.
Where to Keep Sinking Funds
You have several options depending on how many categories you have:
Option 1: Sub-Savings Accounts
How it works:
- Open multiple savings accounts (one per category)
- Many banks allow unlimited sub-accounts
- Each account clearly labeled (Car Repair, Holiday Gifts, etc.)
- Transfer specific amounts monthly
Best banks for multiple sub-accounts:
- Ally Bank (unlimited “buckets” within one savings account)
- Capital One 360 (up to 25 savings accounts)
- Marcus by Goldman Sachs (unlimited savings accounts)
- Discover (multiple savings accounts allowed)
Pros:
- Physically separated money (can’t accidentally spend)
- Easy to track each category
- Earns interest on all categories
Cons:
- Can be overwhelming with many accounts
- Some banks limit number of accounts
Option 2: One Savings Account with Spreadsheet Tracking
How it works:
- All sinking fund money in one HYSA
- Track categories in a spreadsheet
- Record contributions and withdrawals by category
- Calculate running balances
Example spreadsheet:
| Category | Target Amount | Monthly Contribution | Current Balance | Status |
|---|---|---|---|---|
| Car Insurance | $1,200 | $100 | $800 | $400 to go |
| Holiday Gifts | $1,500 | $125 | $625 | $875 to go |
| Vacation | $3,000 | $167 | $1,000 | $2,000 to go |
| Car Repairs | Rolling | $100 | $450 | Good buffer |
| TOTAL | $492 | $2,875 |
Pros:
- Simpler account management
- All money earns interest together
- One account to monitor
Cons:
- Requires manual tracking
- Easier to “borrow” from one category for another
- Need discipline to maintain spreadsheet
Option 3: Budgeting App with Sinking Fund Features
Apps with built-in sinking funds:
YNAB (You Need A Budget):
- Creates virtual “envelopes” for each category
- Tracks balances automatically
- Syncs with bank accounts
- Shows progress toward goals
- Cost: $99/year
EveryDollar:
- Sinking fund categories
- Visual progress bars
- Free version or $79.99/year premium
Qapital:
- Automated savings rules
- Multiple goals simultaneously
- Round-ups and triggers
- Cost: $3-12/month
Pros:
- Automatic tracking
- Visual progress
- Mobile access
- No manual math
Cons:
- Subscription costs
- Requires consistent app use
- Learning curve
Option 4: Physical Envelope Method
How it works:
- Label envelopes for each category
- Put cash in envelopes monthly
- Use only that envelope’s cash for that expense
- Works for smaller, frequent expenses
Pros:
- Tangible, visual
- Impossible to overspend
- No technology needed
Cons:
- Only works for cash purchases
- Risk of loss or theft
- Doesn’t earn interest
- Not practical for large amounts
Best approach for most people: Option 1 (sub-savings accounts) or Option 2 (one account with spreadsheet), depending on your preference for simplicity vs. separation.
How to Start Using Sinking Funds
Step 1: Identify your needed sinking funds
Look at last year’s expenses and upcoming needs:
- Review bank statements for irregular expenses
- List annual or semi-annual bills
- Note seasonal spending patterns
- Consider upcoming major expenses
Make a list: Example: Car insurance, gifts, vacation, home repairs, car maintenance
Step 2: Calculate how much you need
For each category:
- Estimate annual cost
- Divide by 12 months
- Write down monthly contribution needed
Step 3: Prioritize your sinking funds
You probably can’t fund everything immediately. Rank by:
- Required/unavoidable (insurance, property taxes)
- Important/likely (car repairs, home maintenance)
- Desired but flexible (vacation, gifts, furniture)
Start with top 3-5 categories.
Step 4: Set up your system
Choose your tracking method:
- Open sub-accounts at high-yield bank
- Create spreadsheet categories
- Set up budgeting app
- Label physical envelopes
Step 5: Automate contributions
On payday:
- Automatic transfer total sinking fund amount to savings
- Manually allocate to categories (if using spreadsheet)
- Or automatic transfers to specific sub-accounts
Example: Payday #1 (15th): Transfer $250 to sinking funds account
- $100 to car insurance sub-account
- $62.50 to gift sub-account
- $87.50 to vacation sub-account
Payday #2 (30th): Repeat
Step 6: Use funds only for intended purpose
Rules:
- Only spend from a category for that expense
- When you use money, withdraw and immediately mark it used
- Replenish the category in following months
- Don’t “borrow” from other sinking funds
Real-World Example: Sinking Funds in Action
The Johnson Family’s Sinking Fund System
Family details:
- Two adults, two kids
- Combined income: $6,500/month
- Monthly budget: $492 to sinking funds
Their 7 sinking fund categories:
1. Car Insurance – $100/month
- Annual premium: $1,200
- Saved monthly, paid once per year
- After one year: Full $1,200 saved, pay premium, restart
2. Holiday and Birthday Gifts – $150/month
- Estimate: $1,800/year for all gifts
- Grandparents, kids’ birthdays, Christmas, etc.
- Draw from fund as needed throughout year
3. Vacation – $200/month
- Goal: $2,400 for summer family trip
- Save for 12 months
- Book vacation, use entire fund, restart saving
4. Car Maintenance and Repairs – $100/month
- Running fund, no specific target
- Oil changes: $60 every 3 months (covered)
- Unexpected repair: $850 (had $750 saved, only $100 short)
- Replenish after use
5. Home Repairs – $75/month
- Annual goal: $900
- Water heater died: $1,200
- Had $600 saved, borrowed $600 from emergency fund
- Rebuilt home repair fund over 8 months
6. Back to School – $50/month
- August expense: $600
- Saved $50/month × 12 = $600
- Fully funded, spent in August, restart
7. Medical Expenses – $67/month
- Meet annual deductible: $800
- Routine dental: $200
- Vision: $200
- Total target: $800/year saved, plus buffer
Total monthly contribution: $742
Wait, that’s more than $492 budgeted. The Johnsons started with just three categories (car insurance, gifts, vacation) for $450/month. After 6 months, they adjusted and added the others as income increased.
Results after one year:
- Zero credit card debt from predictable expenses
- Paid cash for vacation (no vacation debt)
- Handled $1,200 water heater emergency with minimal stress
- All annual bills paid without scrambling
- Reduced financial anxiety significantly
Common Sinking Fund Mistakes to Avoid
Mistake 1: Treating sinking funds like emergency fund
The problem: Using your vacation fund for a car repair because “it’s both savings.”
The solution: Keep sinking funds and emergency fund completely separate. Use emergency fund for true emergencies, sinking funds only for their designated purpose.
Mistake 2: Not starting because you can’t fund everything
The problem: “I need $800/month for all sinking funds but only have $200, so I won’t start.”
The solution: Start with what you can afford. Fund the top 2-3 priorities. Add more as your budget allows. Something is better than nothing.
Mistake 3: Unrealistic contribution amounts
The problem: Budgeting $500/month for vacation when you can’t consistently save that much.
The solution: Start with achievable amounts. Better to successfully save $100/month than fail at $500/month.
Mistake 4: Raiding sinking funds for wants
The problem: “I’ll just borrow $200 from my car repair fund for these concert tickets.”
The solution: This defeats the purpose. If you want concert tickets, create a sinking fund for entertainment or cut spending elsewhere.
Mistake 5: Not adjusting amounts as life changes
The problem: Still budgeting $50/month for gifts when you’ve had two more kids and four more nieces/nephews.
The solution: Review sinking fund amounts every 6 months. Adjust up or down based on reality.
Mistake 6: Forgetting about annual expenses
The problem: Amazon Prime renews and you forgot, causing budget chaos.
The solution: List EVERY annual, semi-annual, and quarterly expense. Set calendar reminders. Include in sinking funds.
Mistake 7: Giving up after using a fund
The problem: Used vacation fund for vacation, stopped contributing because “we already took the trip.”
The solution: Immediately restart contributions after using a fund. Next year’s vacation/gift/expense is coming.
Advanced Saving Strategies: Combining Both Funds
The optimal savings hierarchy:
Priority 1: $1,000 Starter Emergency Fund Build this first before anything else (except employer 401k match).
Priority 2: High-Interest Debt Payoff Pay off credit cards over 15% APR while maintaining $1,000 emergency fund.
Priority 3: Essential Sinking Funds Start 2-3 critical sinking funds (car insurance, car repairs, gifts).
Priority 4: Full Emergency Fund Build to 3-6 months of expenses.
Priority 5: All Remaining Sinking Funds Add vacation, home improvement, and other categories.
Priority 6: Additional Goals Down payment, college savings, extra retirement contributions.
Example monthly allocation:
Starting out (Month 1-3):
- $200/month → Starter emergency fund
- Everything else → Minimum debt payments and essentials
Early stage (Month 4-12):
- $100/month → Emergency fund (building to full amount)
- $150/month → Top 3 sinking funds
- $300/month → Extra debt payment
Established (After emergency fund complete):
- $0 → Emergency fund (fully funded)
- $300/month → All sinking funds
- $200/month → House down payment
- $150/month → Extra retirement
Savings Automation: Set It and Forget It
The most effective saving strategy is automation. Here’s how to set up completely automated savings:
Step 1: Set up accounts
- Primary checking (income deposits here)
- High-yield savings for emergency fund
- Secondary savings for sinking funds (or multiple sub-accounts)
Step 2: Automate emergency fund
- Payday → $200 automatic transfer to HYSA
- Set it and forget it
- Only check quarterly to admire progress
Step 3: Automate sinking funds
- Payday → $400 automatic transfer to sinking fund account
- If using sub-accounts, set up transfers to each category
- Or transfer lump sum and manually allocate in spreadsheet
Step 4: Round-up apps (optional bonus)
- Link Acorns, Digit, or Qapital
- Automatically rounds up purchases
- Transfers spare change to savings
- Extra $50-100/month without thinking
Complete automation example:
Every payday (bi-weekly):
- Paycheck deposits: $2,000
- Automatic transfers (same day):
- Emergency fund HYSA: $100
- Sinking funds account: $200
- 401(k): $150 (pre-tax)
- Remaining in checking: $1,550 for bills and spending
Total automated savings: $900/month ($450 + $450 from two paychecks)
You never see this money. It’s saved before you can spend it. This is the “pay yourself first” principle in action.
How Much Should You Save Total?
The complete savings breakdown:
| Category | Percentage of Income | Priority Level |
|---|---|---|
| Emergency fund | Variable (until fully funded) | Highest |
| Sinking funds | 5-10% | High |
| Retirement | 15-20% | High |
| Other goals | 5-10% | Medium |
| Total savings | 25-35%+ |
For different income levels:
Lower income ($30,000-40,000/year):
- Emergency fund: $100-200/month
- Sinking funds: $100-200/month
- Retirement: 401k match at minimum
- Total: 10-15% of income
Middle income ($50,000-75,000/year):
- Emergency fund: $200-300/month (until complete)
- Sinking funds: $300-500/month
- Retirement: $500-750/month
- Total: 20-25% of income
Higher income ($100,000+/year):
- Emergency fund: $500/month (until complete)
- Sinking funds: $500-800/month
- Retirement: Max out ($23,000/year in 2025)
- Other goals: $500+/month
- Total: 30-40% of income
Remember: These are targets. Start where you are and gradually increase.
Frequently Asked Questions
Should I save for sinking funds or pay off debt first?
The balanced approach:
- Build $1,000 starter emergency fund first
- Pay minimums on all debts
- Start 1-2 essential sinking funds ($100-200/month)
- Throw everything else at high-interest debt
- Once debt-free, build full emergency fund
- Then fully fund all sinking funds
Why include sinking funds during debt payoff: Without them, you’ll go right back into debt when car insurance is due or holidays arrive. Small sinking funds prevent new debt.
How do I save money when I live paycheck to paycheck?
Start extremely small:
- Save $5-10 per paycheck to start
- Find $50-100 to cut (cancel subscriptions, reduce dining out)
- Redirect found money to savings
- Increase income (overtime, side gig)
- Use windfalls (tax refund, bonuses)
Even $25/month × 12 = $300 saved. That’s $300 you didn’t have before. Start small, build momentum.
Can I have too much in my emergency fund?
Yes, beyond 12 months of expenses is excessive. Money sitting in savings earning 4-5% could be:
- Invested earning 8-10% average
- Paying off mortgage early
- Funding other financial goals
Exception: Self-employed in uncertain industry might justify 12+ months.
Solution if overfunded: Move excess beyond 6-9 months to investments or other goals.
What if I need to use my emergency fund?
When you use emergency fund:
- Pause other savings goals temporarily (except retirement match)
- Redirect that money to rebuild emergency fund
- Replenish to full amount as quickly as possible
- Then resume other goals
Example:
- Used $3,000 for unexpected medical bill
- Pause vacation savings ($200/month)
- Pause extra debt payment ($150/month)
- Redirect $350/month to emergency fund
- Rebuilt in 9 months
- Resume other goals
How do sinking funds work for irregular income?
For freelancers/commission workers:
Method 1: Save percentage of every payment
- Get paid $5,000 → save $500 immediately (10%)
- Allocate 10% to sinking funds
- Builds up during good months, available during slow months
Method 2: Base on lowest income month
- Look at past 12 months
- Find lowest income month
- Budget based on that amount
- Anything above goes to savings/sinking funds
Method 3: Annual calculation
- Estimate annual income: $60,000
- Monthly average: $5,000
- Budget as if you earn $5,000 every month
- Set aside excess during high-earning months
Where should I keep my sinking funds if I need them soon?
Timeline-based storage:
Needed within 3 months:
- High-yield savings account
- Money market account
- Regular savings at your bank
Needed in 3-12 months:
- High-yield savings account
- 3-6 month CD
- I-Bonds (can’t access for 12 months)
Needed in 1-5 years:
- CD ladder
- I-Bonds
- Conservative investment (60/40 portfolio)
Keep most sinking funds liquid since you’ll use them throughout the year.
What’s the difference between a sinking fund and a savings goal?
They’re similar but different in purpose:
Sinking fund:
- For expenses that WILL happen
- Prevents debt for known costs
- Continuously funded and depleted
- Examples: Car insurance, gifts, home repairs
Savings goal:
- For wants or one-time big purchases
- Optional, can be delayed
- Usually saved once and fully depleted
- Examples: House down payment, dream vacation, new car
Both use same mechanics (save monthly toward target), but different purposes.
Should I save for retirement or build sinking funds first?
The balanced approach:
Priority order:
- Starter emergency fund ($500-1,000)
- Employer 401(k) match (free money, don’t skip)
- Essential sinking funds (2-3 categories)
- High-interest debt payoff
- Full emergency fund
- 15% to retirement
- All sinking funds
- Extra retirement above 15%
Never skip the 401(k) match even while building emergency fund. It’s free money and instant 100% return.
How often should I review my saving strategies?
Review schedule:
Monthly:
- Check that automated transfers happened
- Verify sinking fund balances
- Ensure emergency fund is intact
Quarterly:
- Review all sinking fund amounts
- Adjust if categories are consistently over/under
- Celebrate progress milestones
Semi-annually:
- Complete savings audit
- Adjust for income changes
- Add or remove sinking fund categories
- Recalculate emergency fund target if life changed
Annually:
- Full financial review
- Set new savings goals
- Adjust percentages
- Plan for upcoming year’s expenses
Your Savings Action Plan: Next Steps
This week:
Day 1: Calculate your emergency fund target (3-6 months of essential expenses)
Day 2: Open a high-yield savings account at online bank (Marcus, Ally, Capital One)
Day 3: Set up automatic transfer for emergency fund ($50, $100, whatever you can afford)
Day 4: List your top 5 sinking fund needs
Day 5: Calculate monthly amounts for each sinking fund
Day 6: Set up sinking fund system (sub-accounts or spreadsheet)
Day 7: Automate sinking fund contributions
This month:
- Make first automated savings contributions
- Track spending to find extra money to save
- Celebrate your first $100 saved
- Tell someone about your savings goals (accountability)
This year:
- Hit $1,000 emergency fund milestone
- Fully fund 2-3 essential sinking funds
- Use sinking funds for intended expenses (no debt!)
- Build toward full emergency fund
- Gradually increase savings percentages
Final Thoughts: Saving Creates Freedom
Building an emergency fund and using sinking funds isn’t about restriction. It’s about freedom.
Freedom from:
- Going into debt for predictable expenses
- Financial panic when emergencies strike
- Living paycheck to paycheck
- Stress about unexpected costs
- Feeling broke despite earning decent income
Freedom to:
- Handle emergencies without crisis
- Pay cash for annual expenses
- Sleep better at night
- Make better financial decisions
- Build wealth over time
- Enjoy spending guilt-free within your budget
The truth about saving strategies:
You don’t need a high income to build savings. You need a system. The saving strategies in this guide—emergency funds and sinking funds—create that system.
Start small. Stay consistent. Automate everything you can. Celebrate milestones. Adjust as you learn.
Your future self will thank you when the car breaks down and you have $1,500 saved for repairs. When holidays arrive and you have $1,000 set aside for gifts. When life throws a curveball and your emergency fund catches you.
The best time to start saving was yesterday. The second best time is today.
Choose one action from this guide and do it right now. Open that high-yield savings account. Set up that first automatic transfer. Calculate your emergency fund target.
Take action. Build your safety net. Create your freedom.
You’ve got this.

